
Repair Cracked Tile, Refresh Grout, and Reseal Caulk for Long-Term Results in Clifton Park Homes

Introduction
Tile protects your home from water and wear. It also sets the look of kitchens, baths, and entryways. When you see cracks, grimy grout, or shrinking caulk, you need a plan that lasts in our local climate.
This guide shows you simple steps that work in real homes. It also explains when to bring in a trusted local expert like Local Handyman Repair for bigger fixes.
Homeowners who explore clifton park handyman services often want help addressing the moisture issues and subfloor movement common in Saratoga County homes. Local technicians understand how seasonal humidity, cold drafts, and older construction affect tile adhesion and grout stability. Their experience helps prevent repeat cracking, hidden water damage, and repairs that fail too soon.
You will learn how to assess damage, choose the right materials, and apply each repair with clean results. Use the checklists to plan your weekend work or prep for a pro service call.
Why tile issues arise in Clifton Park homes
Clifton Park gets cold winters, warm summers, and plenty of freeze and thaw. Indoor humidity also swings. These changes shift floors and walls. That movement strains tile, grout, and caulk.
Common causes
- Seasonal movement. Subfloors and walls expand in summer and contract in winter. Tile is rigid. Joints and caulk must absorb the difference.
- Moisture. Showers, tubs, and kitchen backsplashes get constant water. Poor ventilation increases moisture load. Grout and caulk age faster.
- Installation issues. Missing movement joints, weak thinset coverage, or wrong mortar for porcelain or stone can lead to hollow spots and cracks.
- Structural deflection. Wood subfloors that flex under load can crack grout and tile. Long spans and undersized joists add to the problem.
- Cleaning habits. Harsh acids can etch grout and stone. Bleach can make caulk brittle. Wrong products shorten life.
If you see early signs, act fast. Small problems cost less and take less time to fix. You can also research local options for clifton park tile repair if you prefer service.
What happens if you ignore cracked tile, dirty grout, or missing caulk
- Water intrusion. Water finds openings and gets behind tile. Backer board swells. Wood framing can rot.
- Mold growth. Wet drywall and backer boards can host mold. You may notice musty smells or stains.
- Loose tiles. Thinset weakens when soaked. Tiles lose bond and sound hollow or shift underfoot.
- Staining and etching. Grout absorbs spills. Dirt and soap scum darken lines and make surfaces look old.
- Higher repair costs. Damage spreads to larger areas. You move from small spot fixes to substrate replacement.
- Safety hazards. Cracked tiles have sharp edges. Missing caulk around tubs creates slippery areas and hidden leaks.
Simple, durable techniques to repair cracked tile
Decide if you will fill a hairline crack or replace the tile. Hairline cracks can be stabilized with epoxy. Larger cracks or broken pieces call for replacement.
Tools and materials
- Matching tile if replacement is needed
- Multi-tool or grout saw
- Chisel and hammer
- Thinset mortar and notched trowel
- Epoxy for crack fill and colorant for blending
- Grout to match existing or a color sealer
- Sponge, bucket, rags, painter’s tape, vacuum
- Eye protection and gloves
Option 1. Fill a hairline crack
- Clean. Wash the tile with a mild cleaner. Rinse with clean water. Dry fully.
- Open the crack slightly. Use a sharp utility blade to remove any loose edges. Vacuum dust.
- Mix a two-part epoxy. Follow label timing. Work in small batches.
- Apply epoxy. Press into the crack with a plastic spreader. Smooth it flush with the tile.
- Color match. While the epoxy is still workable, add a small amount of colorant if needed.
- Clean edges. Use a lint-free cloth with a trace of solvent recommended by the epoxy maker. Do not flood the area.
- Cure. Keep traffic off the area for the full cure time. Many products need 24 hours.
This works for tight, non-structural cracks. If the tile moves when you press on it, the bond below is failing. Replace that tile.
Option 2. Replace a cracked tile
- Score grout. Cut the grout around the tile with a grout saw or oscillating tool. Do not cut into neighbors.
- Break out the tile. Place a chisel at the center of the tile and tap with a hammer to crack it inward. Remove pieces carefully.
- Clean the substrate. Scrape away old thinset. Vacuum dust. Check for moisture damage. If the backer moves, you may need a pro.
- Dry fit the new tile. Check spacing and height. Trim high thinset ridges nearby if needed.
- Set the tile. Use thinset rated for your tile type. Back-butter porcelain or stone if needed. Press the tile into place. Align with spacers.
- Let it set. Follow the thinset cure time. Many need 24 hours before grouting.
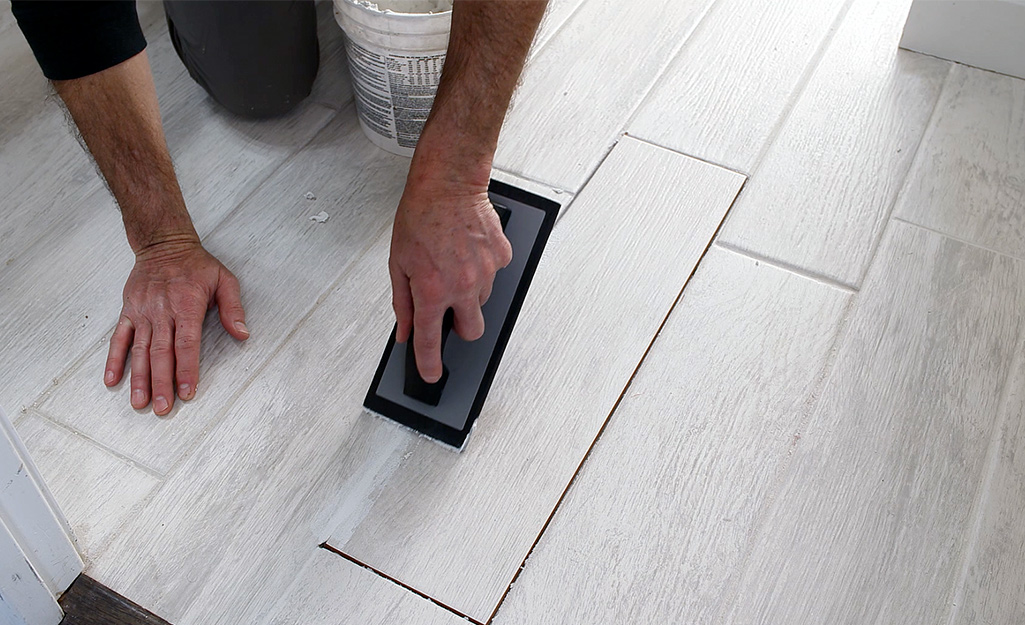
- Grout the joints. Mix grout to a peanut butter feel. Pack joints with a rubber float. Wipe with a damp sponge. Do not overwash.
- Final clean. Buff haze with a dry cloth after the grout firms up. Seal grout after it cures if it is cement based.
Pro tips for a lasting tile repair
- Match materials. Use the same grout type already in place unless you plan to recolor seal all lines.
- Use a movement joint. In larger floors or where the floor meets walls or tubs, keep a flexible caulk joint instead of grout.
- Check for hollow spots. Tap nearby tiles with a coin. If you hear hollow sounds, plan for more repairs.
- Mind stone surfaces. Avoid acids on marble, travertine, and limestone. Use pH-neutral cleaners.
If your cracked area sits near a doorway, kitchen island, or heavy refrigerator, movement may be the cause. Stabilize the subfloor before doing more clifton park tile repair in that zone.
Best way to refresh dirty grout using affordable materials
Start with cleaning. If stains remain after cleaning, recolor the grout or remove and replace it. Pick the method based on the depth of staining and the condition of the joints.
Step 1. Deep clean
- Dry scrub. Use a stiff nylon brush to loosen surface soil.
- Oxygen bleach. Mix oxygen bleach powder with warm water as directed. Apply to grout. Let it sit 10 to 15 minutes. Scrub and rinse.
- Steam. A small steam cleaner can lift oil and soap scum without chemicals.
- Stone caution. Do not use vinegar or acid on natural stone. Use pH-neutral cleaner only.
Step 2. Recolor and seal
If grout is sound but looks blotchy, use a grout color sealer. It restores color and adds a protective seal.
- Clean and dry. Grout must be free of residue and fully dry.
- Apply sealer. Use a small brush or sponge tip. Work a thin coat into lines.
- Wipe tile faces. Use a damp cloth to remove excess from tile before it dries.
- Second coat if needed. Follow the product instructions for coverage.
Color sealers last several years with gentle cleaning. They are a good budget fix for large floors.
Step 3. Regrout damaged joints
If grout is cracked or missing, remove and replace it. Focus on joints where the grout has lost bond or turned soft.
- Remove old grout. Use a grout saw, oscillating tool, or rotary tool with a grout bit. Cut to at least half the depth of the joint.
- Vacuum dust. Wipe the joints with a damp cloth. Let them dry.
- Mix grout. Choose sanded grout for joints 1/8 inch or larger. Use unsanded for slimmer joints and for soft stone.
- Pack joints. Use a rubber float at a 45 degree angle. Work diagonally across joints.
- Clean. Wipe with a damp sponge in light passes. Rinse the sponge often. Avoid dragging grout out of joints.
- Cure. Keep the area dry and free of traffic per the bag instructions.
- Seal cement grout. Use a penetrating sealer after the cure period. Apply two thin coats for best results.
Budget and timing
- Deep clean only. Low cost and one afternoon for a typical bathroom.
- Color seal. Medium cost and one day for a bathroom. Two days for a large kitchen floor.
- Regrout. Medium to higher cost and one to two days based on area size.
How and when to reapply caulking for showers, tubs, and floor joints
Caulk fills change-of-plane joints. It keeps water from seeping behind tile where it meets tubs, walls, and floors. It also seals edges around sinks, backsplashes, and thresholds.
Pick the right caulk
- 100 percent silicone. Best for wet areas like showers and tub surrounds. Highest flexibility and water resistance.
- Siliconized acrylic. Easier to tool and paintable. Good for backsplashes and dry transitions.
- Match color. Use a color that blends with grout or tile. Clear works well around glass and metal.
Prep and removal
- Dry the area. Do not caulk on damp surfaces.
- Cut out old caulk. Use a caulk removal tool or a plastic scraper. Work both sides of the bead.
- Clean. Wipe with mineral spirits if silicone was used. Follow with isopropyl alcohol. Let it dry. Protect nearby surfaces.
- Tape the joint. Apply painter’s tape to both sides for a crisp line.
Application
- Load the gun. Cut the nozzle at a 45 degree angle. Start with a small hole.
- Apply a steady bead. Keep even pressure. Move at a steady speed.
- Tool the bead. Use a caulk tool or a gloved finger dipped in soapy water. Smooth once. Do not overwork it.
- Remove tape. Pull tape away while the bead is still wet.
- Cure. Follow product directions. Many silicones need 24 hours before water exposure.
When to recaulk
- Every 1 to 3 years in showers based on use and cleaning habits.
- When you see gaps, mildew that does not clean off, or shrinking edges.
- After any tile repair that disturbs change-of-plane joints.
When to call a pro for clifton park tile repair
- Widespread cracking. Several tiles show cracks or sound hollow. The subfloor or thinset may be failing.
- Movement or flex. Floors bounce or creak. You feel tiles shift underfoot.
- Water damage. Soft drywall, swelling baseboards, or recurring mildew. Hidden leaks are likely.
- Shower pan issues. Loose floor tiles or a musty smell that returns after cleaning.
- No spare tiles. A pro may source a close match or propose a layout change.
- Stone care. Natural stone needs special cleaners and sealers. Avoid damage with expert help.
A pro can locate the cause of the failure. They can also repair substrates and add movement joints. This prevents new cracks and protects your investment. If you prefer to book service, research options for clifton park tile repair and ask about inspection steps, materials, and warranty.
Seasonal tile maintenance checklist for Clifton Park homes
Seasonal checks help you catch issues early. Use this quick list twice a year. You can also review this Albany area seasonal home maintenance checklist to plan the rest of your upkeep.
Spring
- Inspect grout lines in showers and backsplashes. Look for hairline cracks and gaps.
- Check caulk around tubs, shower corners, and sink backsplashes. Replace if it pulls away.
- Clean bathroom exhaust fans. Improve ventilation to slow moisture damage.
- Seal cement grout if last sealing was more than one year ago.
Fall
- Look for loose tiles at entries after summer humidity changes.
- Deep clean kitchen and bath grout. Recolor seal high traffic areas.
- Check for drafts or cold spots near tiled exterior walls. Address insulation or air leaks.
- Plan any clifton park tile repair before holiday guests arrive.
For more project guides and cost-saving tips, visit the Local Construction Repair blog.
Trends in Clifton Park. Repair costs and service call timing
Homeowners often ask about costs and how fast they can schedule service. Here are typical local ranges for small to medium tile repair jobs. Actual pricing varies by tile type, access, and damage under the surface.
| Project type | Typical range in Clifton Park | Average scheduling wait |
|---|---|---|
| Single cracked tile replacement | $150 to $350 per tile | 3 to 7 days |
| Hairline crack epoxy fill | $120 to $220 per visit | 3 to 5 days |
| Recaulk tub or shower surround | $120 to $250 | 2 to 5 days |
| Regrout shower walls | $6 to $12 per sq ft | 5 to 10 days |
| Kitchen floor grout color seal | $2 to $4 per sq ft | 3 to 7 days |
| Sectional tile demo and reset with substrate patch | $450 to $1,200 | 7 to 14 days |
Peak demand often hits in spring and early fall. Plan ahead for larger jobs or combine several tasks in one visit to save time.
Step-by-step checklist you can follow today
Assess
- Walk the area. Note any loose, cracked, or hollow tiles.
- Inspect grout lines. Mark cracks, missing joints, or stained sections.
- Check caulk at all change-of-plane joints. Look for gaps and mildew.
- Measure the area that needs work. Take photos for reference or quotes.
Plan
- Choose repair paths. Crack fill or tile replacement. Clean and color seal or regrout. Recaulk as needed.
- Match materials. Bring a tile or grout sample to the store for a close match.
- Schedule work. Allow full cure times before heavy use or water exposure.
Do the work
- Set up protection. Use drop cloths and painter’s tape. Ventilate bathrooms.
- Complete tile fixes first. Fill hairline cracks or replace damaged tiles.
- Refresh grout. Deep clean. Then recolor seal or regrout.
- Reseal caulk lines. Use 100 percent silicone in wet areas. Smooth clean lines.
- Final seal. Apply penetrating sealer to cured cement grout.
Maintain
- Use pH-neutral cleaners. Avoid harsh acids on grout and stone.
- Dry shower walls after use. A quick squeegee reduces buildup.
- Check joints each season. Repair small defects early.
Safety and prep tips
- Wear safety glasses and gloves when cutting grout and tile. Sharp edges can chip.
- Use a dust mask when grinding grout or thinset. Vacuum as you go.
- Turn off water if you suspect a leak behind tile. Stop further damage.
- Open a window and run the fan when using silicone or solvents.
- Respect cure times. Rushing can ruin the finish and bond strength.
Choosing materials that last in our climate
- Thinset. Use polymer-modified thinset for porcelain. It bonds better in variable temps.
- Backer boards. Cement board or foam backer in showers. Use proper waterproofing over seams.
- Waterproofing. Apply a liquid membrane on shower walls before tile. Use fabric at corners.
- Grout. High-performance cement grout with sealer additives or epoxy grout in heavy-use showers.
- Sealants. 100 percent silicone at all changes of plane. Penetrating sealer on cement grout once cured.
Common mistakes to avoid
- Grouting corners or tub edges. These joints need flexible caulk, not grout.
- Using acid on stained grout. It can weaken joints and damage stone.
- Skipping substrate checks. Replacing a tile over a soft backer will fail again.
- Overwashing grout. Excess water leads to weak joints and color loss.
- Applying caulk to damp surfaces. Trapped moisture causes early failure.
FAQs
How do I know if a crack is only cosmetic
Press around the crack. If the tile does not move and the sound is solid, it is likely cosmetic. If it shifts or sounds hollow, plan for replacement and inspect the substrate.
Can I use grout sealer to fix a leak
No. Sealers reduce staining but do not waterproof failed joints. Replace missing grout and recaulk wet area joints.
What caulk should I use around a tub
Use 100 percent silicone rated for kitchens and baths. It resists water and mold better than acrylics.
How often should I seal grout
Every 1 to 3 years for cement grout, based on traffic and cleaning products. Epoxy grout does not need sealing.
Can I match old grout color
Exact matches can be hard. A grout color sealer can unify tone across the floor or shower for a consistent look.
Is it worth fixing a few cracked tiles
Yes. Small repairs stop water and prevent bigger failures. You also keep the area safe and maintain home value.
Smart ways to save on tile repairs
- Bundle small tasks. Combine a few tile replacements with a recaulk visit.
- Source extra tile now. Buy a spare box for future repairs while it is still available.
- Prep before the pro arrives. Clear the area and note all problem spots.
- Choose color sealing over full regrout when joints are sound but stained.
How a local expert approaches lasting repairs
A thorough service starts with inspection. The tech checks for hollow tiles, moisture behind walls, and movement in the floor. They select the right materials for your tile type and use flexible joints where needed. They also set clear cure times so the repair reaches full strength. If you want support beyond DIY, compare options for clifton park tile repair and ask about inspection, materials, and warranties.
Conclusion
Cracked tile, stained grout, and shrinking caulk do not need to be a headache. You can fix many issues with simple tools and the right products. The key is to act early, use flexible joints where surfaces meet, and follow cure times. When you see signs of movement, moisture, or widespread failure, call a local pro.
If you want a reliable partner for lasting results, contact Local Handyman Repair. You get practical solutions that fit local conditions and a clean finish that holds up in real life.